You can transform your garden into a personalized outdoor haven using materials you already have at home or can find at minimal cost. Creating your own garden decor lets you express your unique style while saving money compared to store-bought pieces, and most projects take just a few hours to complete with basic tools like paint, glue, and a drill. The best DIY garden decorations combine creativity with durability, using weatherproof materials that withstand sun, rain, and seasonal changes.
Whether you’re working with a sprawling backyard or a compact patio, handmade outdoor garden decoration ideas give your space character that mass-produced items simply can’t match. I started my own DIY journey five years ago with a simple painted rock border, and now my garden features everything from repurposed furniture planters to hand-painted stepping stones that guests always ask about.
The real magic happens when you realize that broken terracotta pots, old pallets, wine bottles, and even worn-out garden tools can become stunning focal points. You don’t need advanced carpentry skills or expensive equipment to create pieces that look professionally crafted. With the right techniques and a weekend afternoon, you’ll have custom decorations that reflect your personality and make your garden feel truly yours.
What You’ll Need: Tools and Materials for DIY Garden Decor
Before you dive into your first project, gather a basic toolkit that’ll serve you across nearly every DIY garden decor idea. You don’t need to buy everything at once, start with what you have and add items as specific projects require them.
The essential supplies fall into three categories:
- Basic Tools: Paintbrushes in various sizes, sandpaper (medium and fine grit), scissors, wire cutters, measuring tape, drill with outdoor-rated bits, hammer, and a hot glue gun
- Finishing Materials: Outdoor acrylic paint or spray paint, clear weatherproof sealant, wood stain, exterior-grade glue, galvanized wire, rope or twine, screws and nails
- Upcycled Treasures: Glass jars and bottles, old wooden pallets, tin cans, used tires, terracotta pots (cracked ones work fine), smooth river rocks or stones, scrap wood, and broken ceramics
For paint, grab outdoor or multi-surface acrylics that explicitly mention weather resistance. Craft stores often run 40-50% off coupons, making brand-name outdoor paints surprisingly affordable. Your sealant matters just as much as your paint, look for products labeled “UV-resistant” or “all-weather” to protect your finished pieces from sun fade and moisture damage.
The beauty of garden decor projects is that many materials cost nothing. Check your recycling bin, garage, or local buy-nothing groups for jars, bottles, and cans. Pallet wood often comes free from hardware stores, garden centers, or construction sites (always ask permission first). Stones and interesting sticks are literally lying around outdoors. Thrift stores sell old plates, bowls, and ceramic pieces for pocket change, perfect for mosaics or bird bath bases.
Keep a designated bin for potential craft materials. That wine bottle from last weekend or the pretty tin from holiday cookies might become your next garden masterpiece.
Safety First: Precautions for Outdoor DIY Projects
Before you start mixing paints or firing up a drill, a few simple precautions will keep your DIY garden decor projects safe and enjoyable. Most accidents happen when we skip the basics, so take a minute to set yourself up properly.
Wear safety glasses whenever you’re cutting, drilling, or hammering. Flying wood splinters, metal shavings, and paint chips don’t need much force to damage an eye. Heavy-duty work gloves protect your hands from splinters, sharp edges on tin cans or cut metal, and the scrap tires and hazardous compounds that may linger on salvaged materials. If you’re sanding or working with concrete, a simple dust mask prevents you from inhaling particles.
Set up on a stable work surface, a wobbling table or uneven ground invites mistakes and injuries. Clamp materials down when cutting or drilling so they don’t shift. Keep power cords away from wet areas and never use electric tools in the rain.
Read product labels on outdoor sealants and paints. Many need full ventilation and specific temperature ranges to cure safely. Store chemicals out of reach of children and pets, and dispose of rags soaked in stains or sealers properly (some can spontaneously combust if wadded up).
Just as you’d consider soil essentials before planting, taking a few safety steps before creating ensures your projects bring joy, not trips to urgent care.
8 DIY Garden Decor Projects You Can Make This Weekend
Painted Rock Garden Markers and Art
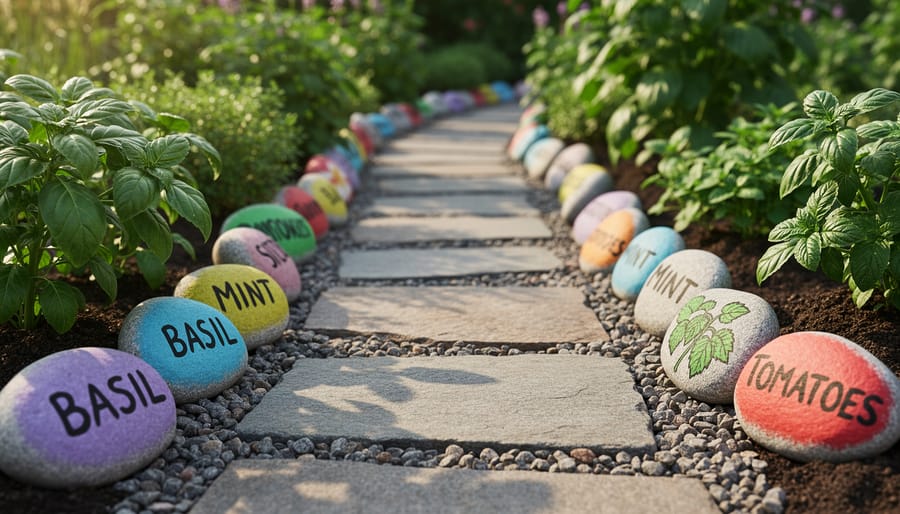
Painted rocks offer one of the simplest entry points into DIY garden decor, you need only rocks, acrylic paint, and a clear sealer. The results can be whimsical garden art or practical plant markers that help you remember where you planted that row of carrots.
Start by gathering smooth, flat rocks from your yard, a creek bed, or a landscaping supplier. Look for stones with relatively even surfaces, roughly 2-4 inches across. Wash them thoroughly with soapy water and let them dry completely, paint won’t adhere to dirty or damp surfaces.
- Apply a base coat of white acrylic paint if your rocks are dark; this makes colors pop and prevents the stone color from showing through.
- Once dry, paint your design: vegetable names for markers, ladybugs or bees for accents, or abstract patterns for decorative pieces.
- Let the paint cure for 24 hours, then apply two coats of outdoor polyurethane or clear acrylic sealer, allowing each coat to dry per the product instructions.
- Test one rock by sprinkling water on it, beads should form rather than soak in, confirming proper weatherproofing.
For garden markers, use a fine-tip brush or paint pen to write plant names clearly. Place finished rocks at the base of plants or along bed edges. The sealer protects your work from rain and sun, but expect to refresh it annually if colors start fading. This project takes about an hour per batch of five rocks, making it perfect for a relaxed afternoon outdoors.
Upcycled Tire Planters
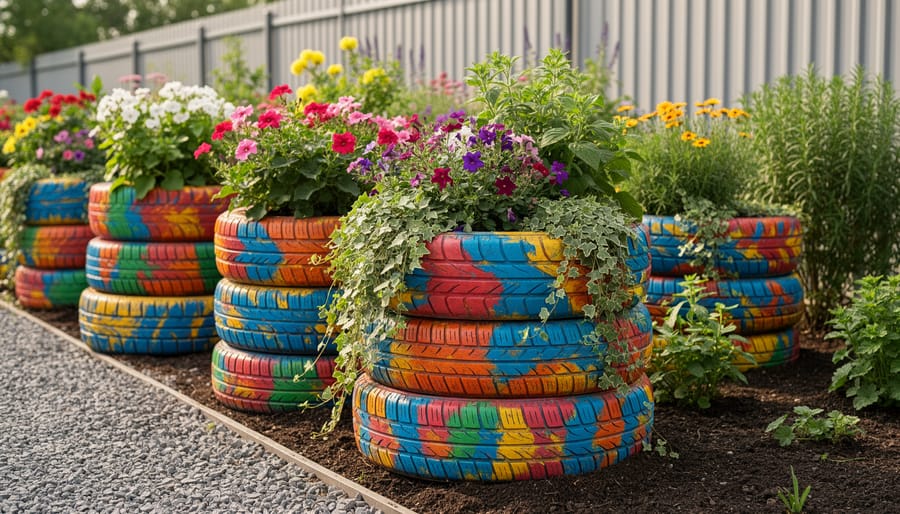
Grab an old tire from your garage or ask a local mechanic, they often give them away for free. Start by scrubbing the tire thoroughly with soapy water and a stiff brush to remove dirt, grease, and road grime. Let it dry completely before painting.
For a simple planter, skip cutting and paint the tire as-is using outdoor acrylic or spray paint. Apply two to three thin coats, letting each dry fully. Bright colors like teal, sunny yellow, or coral make striking garden accents. You can also create patterns with painter’s tape or stencil designs.
If you want to flip the tire inside-out for a scalloped edge (more advanced), use a sharp utility knife to cut around the inner rim, then wrestle it inverted. This takes muscle but creates a blooming flower effect.
Drill three to five drainage holes in the bottom before filling with soil. Stack multiple painted tires for a tiered planter tower, or lay one flat and fill it directly for low-growing flowers and herbs.
Mason Jar Lanterns and Luminaries
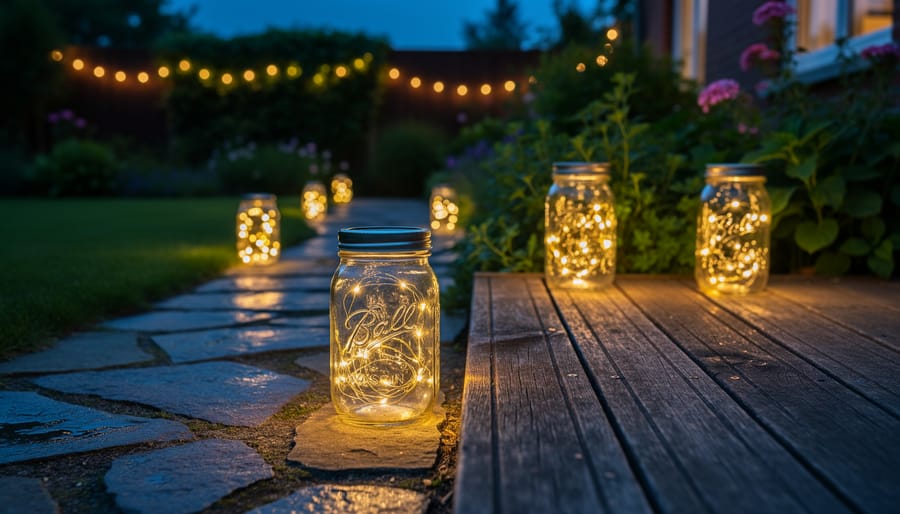
Mason jars transform into charming garden lights with minimal effort and cost. Start by cleaning your jars thoroughly and removing any labels with warm soapy water. For hanging lanterns, wrap 18-gauge wire around the jar’s neck groove, twisting it tightly to secure, then create a handle by twisting two longer wire pieces together and attaching them to opposite sides. You can also purchase pre-made wire jar hangers at craft stores.
Drop a battery-operated tea light or small solar light into each jar. Solar lights work wonderfully because they charge during the day and automatically illuminate at dusk. For extra charm, add decorative elements like colored glass beads, sand, or battery-powered fairy lights before placing your light source inside.
Hang your lanterns from shepherd’s hooks, tree branches, or pergola beams using the wire handles. For tabletop versions, skip the wire handle and simply set decorated jars on outdoor tables or along pathways. Group three or five lanterns at varying heights for the most visual impact.
Pallet Wood Garden Signs
Start by locating a heat-treated pallet (marked with “HT” stamp) rather than chemically treated wood. Use a pry bar and hammer to carefully separate the planks, working slowly to avoid splintering the boards. Once you have your pieces, sand all surfaces with 80-grit sandpaper to remove rough spots and splinters, then finish with 120-grit for smoothness.
Choose your finish based on the look you want. Apply wood stain for a rich, natural appearance, or leave the wood raw for maximum rustic charm. Let any stain dry completely before adding text.
For lettering, sketch your message lightly in pencil first. You can paint letters freehand with outdoor acrylic paint and a fine brush, use stencils for crisp edges, or try the transfer method by tracing over printed text with carbon paper. Garden-themed phrases like “Herb Garden” or “Welcome to Our Sanctuary” work beautifully.
Apply two coats of outdoor polyurethane or spar varnish to all surfaces, letting each coat dry for 24 hours. This weatherproofing step protects both the wood and your artwork from rain and sun damage.
Wine Bottle Border Edging
Collect at least 15-20 wine bottles in various colors, amber, green, and clear bottles create visual interest along garden bed edges. Remove labels by soaking bottles in warm, soapy water overnight, then scrubbing off residue with a scouring pad.
Dig a narrow trench approximately 6-8 inches deep along your garden bed perimeter, keeping the trench width just slightly larger than your bottle diameter. The depth determines how much of each bottle shows above ground; deeper placement creates a more subtle border.
Turn bottles upside down and nestle them tightly together in the trench, angling them slightly inward for stability. Pack soil firmly around each bottle, tamping it down with your hands or a small tool. The necks buried in soil provide surprising stability against frost heave and accidental bumps.
For extra security in high-traffic areas, place a thin line of construction adhesive between bottles before backfilling with soil.
Stacked Stone Cairns and Sculptures
Stacked stone cairns bring an ancient, meditative quality to modern gardens. Start by collecting smooth, flat stones from your yard, a riverbed, or a landscaping supply yard, aim for a variety of sizes with at least one flat surface on each. Larger, stable stones form the best base.
Begin with your biggest stone as the foundation on level ground. Place each subsequent stone so its center of gravity rests directly over the contact point below. Rotate stones slowly until you feel them “lock” into balance. This takes patience, expect some toppling as you learn. Build upward, gradually decreasing stone size, keeping your tower’s center aligned.
For purely decorative cairns in windy areas, apply a small dab of clear exterior construction adhesive between stones. True balance purists skip adhesive, accepting that nature will eventually reclaim their work. Either approach creates a striking focal point that invites contemplation.
Tin Can Hanging Planters
Soup cans and coffee tins make surprisingly stylish hanging planters that cost practically nothing. Start by cleaning your cans thoroughly and removing all labels and adhesive residue with hot soapy water. Use a hammer and nail to punch 3-4 drainage holes in the bottom, flip the can upside down on a wood block while you work to prevent denting.
Sand any sharp edges smooth, then apply a rust-inhibiting primer followed by 2-3 coats of outdoor spray paint in your chosen color. Let each coat dry completely. For drainage, you can also punch small holes around the bottom rim.
Create the hanger by punching two holes opposite each other near the top rim. Thread sturdy wire, jute twine, or nylon rope through both holes, knotting securely on the inside. For heavier cans, use two sets of holes to create a four-point hanging system for better balance.
Fill with potting mix and small plants like succulents, herbs, or trailing flowers. Group several cans at varying heights along a fence or porch beam for a charming vertical garden display.
DIY Bird Baths from Repurposed Items
Terracotta pots make excellent bird bath bases. Stack two or three pots upside-down to create height, securing them with waterproof adhesive designed for outdoor use. Top the stack with a shallow terracotta saucer or old plate as the water basin. The saucer should be 1-2 inches deep, birds prefer shallow water where they can stand comfortably.
For a ground-level option, nestle a shallow bowl directly into your garden soil or place it on a flat stone. Old serving platters, pie dishes, or even upturned trash can lids work beautifully. Sand rough edges on ceramic pieces to prevent injury.
Concrete molds offer durability. Press a shallow bowl into quick-setting concrete poured into a larger container, creating a custom basin. Remove the mold after 24 hours.
Position your bird bath in partial shade near shrubs where birds can retreat if startled, but with enough open space to spot approaching cats. Refresh the water every 2-3 days to prevent mosquitoes and algae buildup.
Making Your Decor Last: Weatherproofing and Maintenance
Your freshly painted rocks and upcycled planters look fantastic, but they need protection to survive rain, sun, and freezing temperatures. Start by testing each piece before placing it in the garden. Sprinkle water on painted or sealed surfaces and watch how it behaves. If droplets bead up and roll off, your sealant is doing its job. If water soaks in or darkens the surface, apply another coat of outdoor-grade polyurethane or clear acrylic sealer and let it cure for at least 48 hours before retesting.
Plan to refresh protective coatings annually, ideally in early spring before the growing season kicks into gear. Outdoor conditions break down even the best sealants over time. Wipe down your pieces to remove dirt and pollen, then apply a fresh layer of sealer to painted surfaces and wooden projects. This simple habit can double or triple the lifespan of your creations.
Winter presents the biggest challenge for garden decorations. Porous materials like terracotta and unsealed wood can crack when moisture freezes and expands. Move fragile items like mason jar lanterns, tin can planters, and painted ceramic pieces into a garage or shed before the first hard freeze. Heavier stone cairns and sealed tire planters can typically stay outside year-round, but check them each spring for shifting or damage.
Get into the habit of inspecting your decor every few months. Look for peeling paint, rust spots on metal elements, loose wire on hanging planters, or wobbly stacked stones. Catching small issues early means a quick dab of paint or a tightening of wire, rather than starting over from scratch. Your garden decorations should bring you joy for years, not just one season.
Common Questions About DIY Garden Decorations
What type of paint works best for outdoor garden decor?
Use acrylic paint designed for outdoor use or spray paint labeled for exterior surfaces, then seal everything with a clear waterproof sealant like polyurethane or marine varnish. This combination protects against rain, sun fade, and temperature changes.
How long will my DIY garden decorations last outside?
With proper sealing and occasional maintenance, most DIY pieces last 2-4 years before needing touch-ups. Painted items and wood projects require resealing annually, while stone and metal pieces can last much longer with minimal care.
Can I make these projects if I live in a harsh climate?
Yes, but choose projects suited to your conditions, stone cairns and metal pieces handle extreme weather better than painted wood or fabric items. Store delicate decorations indoors during winter or severe storms to extend their life.
Which project should a complete beginner start with?
Painted rock garden markers are perfect for first-timers since they require minimal tools, cost almost nothing, and teach the basics of outdoor sealing. Mason jar lanterns are another easy win that delivers immediate visual impact.
How much should I budget for DIY garden decor projects?
Most individual projects cost $5-20 if you use upcycled materials and already own basic tools. Budget $30-50 for paint, sealant, and adhesives that will serve multiple projects throughout the season.
After you’ve completed a few projects, you’ll find creative ways to integrate your new decor with existing garden features. Painted rocks make charming labels near an irrigation system while mason jar lanterns look beautiful along pathways to beds of herbal flowers. The beauty of DIY is adapting each piece to your unique space.
You’ve now got eight weekend-friendly projects to choose from, so pick whichever one sparks your creativity and dive in. Even a single painted rock or tin can planter will add charm to your garden without costing much or demanding expert skills. The beauty of DIY is that every piece reflects your personality and makes your outdoor space truly yours.
Once you’ve completed your first project, consider adapting your decor for different seasons or pairing your handmade accents with low-water plants for an effortless, cohesive look. Share photos of your creations with fellow gardeners online or swap ideas at local garden clubs. Remember, beautiful outdoor garden decorations grow from imagination and a willingness to experiment, not from a hefty budget or professional training. Start small, enjoy the process, and watch your garden transform.