Growing icebox watermelons is surprisingly straightforward, even in small gardens or containers, and you can harvest sweet, personal-sized melons in just 70 to 85 days from planting. These compact varieties produce fruits weighing 5 to 15 pounds, perfect for small families and refrigerator storage, while their shorter vines need only 3 to 4 feet of space compared to the sprawling 10-foot monsters of traditional watermelon plants. The key to success lies in warm soil (at least 70°F), consistent watering during fruit development, and choosing the right variety for your space.
I’ll never forget my first attempt at growing full-sized watermelons in my tiny backyard. The vines took over everything, strangling my tomatoes and creeping onto the patio furniture. When I discovered icebox varieties the following season, it felt like finding the perfect solution I didn’t know existed. These smaller watermelons deliver all the summer sweetness without demanding half your garden or requiring a workout to lift them.
Whether you’re working with a compact raised bed, a sunny patio corner, or simply want melons that actually fit in your fridge, icebox watermelons make homegrown fruit accessible and genuinely rewarding for gardeners at any experience level.
What You’ll Need to Grow Icebox Watermelon
Before you plant your first icebox watermelon seed, gather everything you’ll need for the entire growing season. Having supplies ready prevents delays during critical planting windows and helps you respond quickly when your plants need care.
Essential Materials and Tools:
- Seeds or Seedlings: Choose certified icebox watermelon seeds from a reputable supplier, or purchase healthy transplants if you’re short on time
- Soil Amendments: Well-aged compost or composted manure to enrich your soil, plus aged manure or peat moss to improve drainage
- Fertilizer: Balanced fertilizer (10-10-10) for early growth and a low-nitrogen, high-phosphorus formula (5-10-10) for flowering and fruiting stages
- Garden Tools: Shovel or spade for soil preparation, hoe for weeding, and hand trowel for transplanting
- Watering Equipment: Soaker hose or drip irrigation system for consistent watering, or a watering can with a gentle spray attachment
- Optional Supports: Straw mulch to keep fruit clean and retain moisture, row covers for frost protection or pest barriers, and small trellises if you’re growing vertically in tight spaces
The soil amendments matter because icebox watermelons need loose, nutrient-rich soil that drains well but holds enough moisture during hot weather. Your watering system is equally important since inconsistent moisture causes bitter fruit or stunted growth. The optional items become necessary depending on your climate and garden setup, row covers extend your growing season in cooler areas, while mulch prevents soil-borne diseases from splashing onto developing fruit. Stock up now, and you’ll be ready to act the moment conditions are right for planting.
Before You Plant: Important Safety and Success Tips
Before you rush to plant those icebox watermelon seeds, a few critical safeguards will save you weeks of wasted effort and potential crop loss. Watermelons are extremely frost-sensitive and won’t germinate in cold soil, so timing your planting correctly is non-negotiable.
Wait at least two weeks after your area’s last expected frost date, and use a soil thermometer to verify the ground is warm enough. Even a brief cold snap can stunt growth permanently or kill young plants outright. If unseasonably cool weather is forecast after planting, protect seedlings with row covers or cloches.
Soil safety matters just as much as timing. Avoid using fresh manure or compost that hasn’t fully decomposed, as it can introduce harmful bacteria like E. coli or Salmonella that contaminate the fruit. Well-aged compost (six months or older) is safe and beneficial. Similarly, don’t plant in areas where pets frequently relieve themselves or near potential chemical runoff.
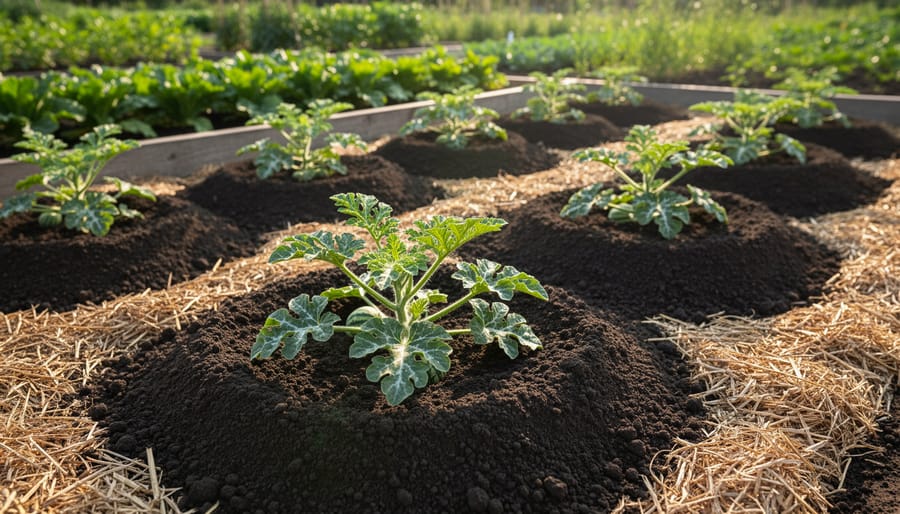
Choose a site with excellent drainage. Watermelons despise wet feet, and standing water invites root rot and fungal diseases that can wipe out your entire planting. If your garden has heavy clay or pools after rain, build raised beds or mounds at least 6-8 inches high.
Finally, protect yourself during garden work. Wear gloves when handling tools and amendments, apply sunscreen for those long planting sessions, and stay hydrated. Sharp hoes and cultivators can cause serious cuts, so keep your focus and store tools safely when not in use.
Step-by-Step: Planting and Growing Your Icebox Watermelon
Step 1: Prepare Your Planting Site
Start by selecting a spot that receives at least 6-8 hours of direct sunlight daily, icebox watermelons need full sun to develop their signature sweetness. The site must have excellent drainage; waterlogged soil invites root rot and disease. Avoid low-lying areas where water pools after rain.
Test your soil’s pH, aiming for 6.0-6.8, and prepare it with soil pH and amendments like compost or aged manure worked in 8-12 inches deep. Watermelons are heavy feeders, so enriching the soil now sets your plants up for vigorous growth.
Create hills or mounds about 4-6 inches high and 2-3 feet in diameter, these improve drainage and warm the soil faster. Space hills 3-4 feet apart for icebox varieties; they’re more compact than standard watermelons but still need room for their vines to spread. If planting in rows, leave 5-6 feet between rows. These smaller spacing requirements make icebox watermelons perfect for modest garden plots.
Step 2: Start Seeds Indoors or Direct Sow
You have two planting options: starting seeds indoors or direct sowing. For an earlier harvest, start seeds indoors 3-4 weeks before your last expected frost date. Plant two seeds per 3-4 inch biodegradable peat pot filled with seed-starting mix, about 1 inch deep. Keep soil consistently moist and warm, 75-85°F speeds germination, which typically takes 3-7 days. Once seedlings emerge, thin to one strong plant per pot and provide bright light.
Prefer direct sowing? Wait until soil temperature reaches at least 70°F, typically 1-2 weeks after your last frost. In warm climates, you can sow 1 week to 10 days after the frost-free date. Plant 4-5 seeds per hill, 1 inch deep, in the prepared mounds from Step 1. Space hills 3-4 feet apart, icebox varieties need less room than standard watermelons. Once seedlings have two true leaves, thin to the two strongest plants per hill by snipping extras at soil level rather than pulling, which disturbs roots.
Water gently after planting either way, keeping soil moist but not waterlogged until seedlings establish.
Step 3: Transplant Seedlings (If Started Indoors)
Don’t rush your indoor-started seedlings straight into the garden. About a week before transplanting, begin hardening them off by placing them outside in a sheltered spot for a few hours daily, gradually increasing their exposure to sun and wind. This prevents transplant shock that can stunt growth or kill young plants.
Wait until soil temperatures consistently reach 70°F before transplanting, usually two weeks after your last frost date. Cold soil will shock watermelon roots and halt development.
When transplanting, handle seedlings by their leaves, never the delicate stem. Dig holes slightly larger than the root ball, place each seedling at the same depth it grew in its container, and firm soil gently around the base. Water immediately with a gentle stream to settle roots and eliminate air pockets. Keep soil consistently moist for the first week while roots establish in their new home.
Step 4: Water Consistently and Deeply
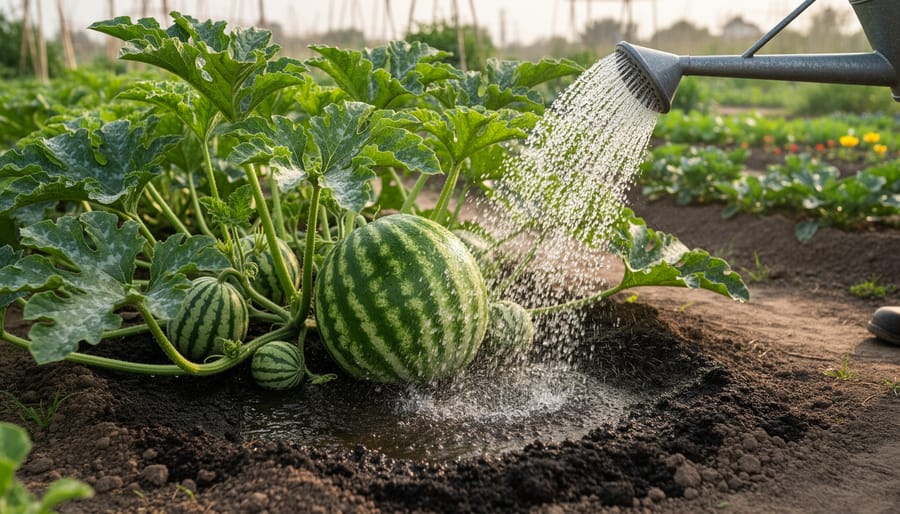
Icebox watermelons need steady moisture to develop sweet fruit. Give your plants 1 to 2 inches of water per week through rain or irrigation, more during hot, dry stretches. Water deeply at the base of the plant rather than sprinkling the leaves, which invites disease. Soaker hoses or drip irrigation work beautifully here; check out these deep watering tips for efficient methods. The goal is to moisten the soil 6 to 8 inches down, encouraging strong roots.
Underwatered plants show wilting vines and small, bitter fruit. Overwatering causes yellowing leaves and increases rot risk. About a week before you expect to harvest, cut back watering significantly. This concentrates sugars in the melon, boosting sweetness and flavor.
Step 5: Fertilize at Key Growth Stages
Your icebox watermelon needs different nutrients at different stages of growth. Feed smartly, and you’ll get sweeter, healthier fruit.
Start with nitrogen-rich fertilizer when seedlings develop their first true leaves. Apply a balanced 10-10-10 fertilizer or compost tea every two weeks to fuel vigorous vine growth. This early feeding builds the strong plant structure needed to support multiple melons.
Once flowers appear, switch your focus. Reduce nitrogen and increase phosphorus and potassium with a 5-10-10 fertilizer. Too much nitrogen at this stage produces leafy vines but few fruits. Apply this bloom-boosting formula every three weeks during flowering and fruiting.
Side-dress plants by sprinkling fertilizer in a circle 6 inches from the stem, then watering it in thoroughly. Avoid getting granules directly on leaves or stems, which can burn tender tissue.
Stop fertilizing two weeks before your expected harvest date. This lets plants channel energy into sweetening the fruit rather than growing more foliage.
Step 6: Support Vines and Manage Growth
Icebox watermelons grow more compactly than standard varieties, but their vines still spread 3-6 feet and benefit from guidance. Let vines sprawl naturally if you have space, gently redirecting them away from pathways as they grow. In smaller gardens, you can trellis compact vines on sturdy supports, use cattle panels, T-posts with netting, or A-frame structures that handle 5-10 pounds per fruit. Support developing melons with fabric slings or old T-shirts tied to the trellis to prevent stems from breaking.
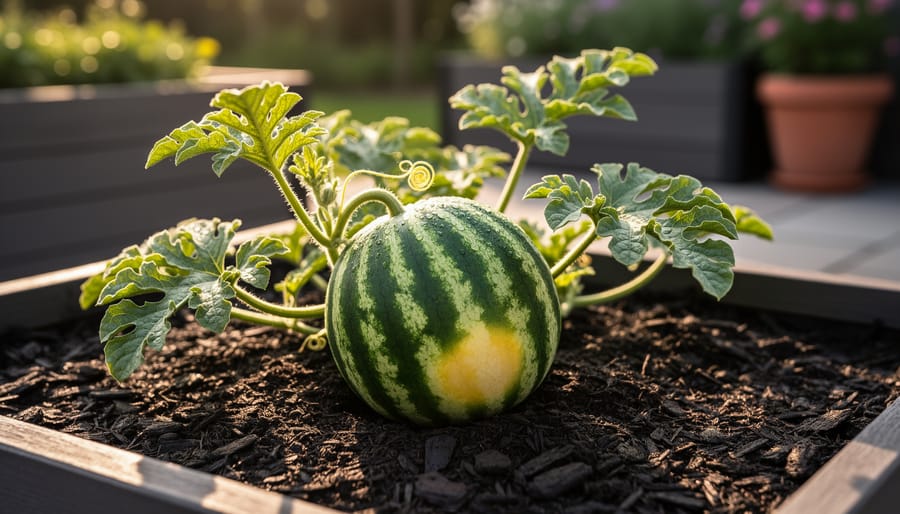
Place a board, piece of cardboard, or straw mulch under melons resting on soil. This barrier prevents rot from ground moisture and deters pill bugs. Check weekly and adjust as fruit grows.
Pruning isn’t necessary for icebox varieties. If vines overtake neighboring plants, pinch back wayward runners after several melons have set. Avoid heavy pruning, leaves power fruit development and protect melons from sunscald.
Step 7: Monitor for Pests and Diseases
Even healthy icebox watermelon plants can fall victim to pests and diseases if you’re not watching closely. The good news? Catching problems early makes them much easier to manage without harsh chemicals.
Cucumber beetles are your primary pest threat. These yellow-and-black striped or spotted beetles chew holes in leaves and can spread bacterial wilt. Check your plants every few days, especially when vines are young. Hand-pick beetles in the morning when they’re sluggish, or use floating row covers until flowers appear (then remove them so pollinators can reach blooms).
Aphids cluster on leaf undersides and new growth, sucking plant juices and leaving sticky residue. A strong spray of water knocks them off, or introduce ladybugs as natural predators.
Powdery mildew appears as white, dusty patches on leaves, particularly during humid weather. Improve air circulation by spacing plants properly and avoid overhead watering. At the first sign, spray affected leaves with a mixture of one tablespoon baking soda per gallon of water.
Inspect your watermelon patch twice weekly. Early intervention, whether removing a few beetles or treating one mildewed leaf, prevents minor issues from becoming crop-threatening disasters.
How to Know When Your Icebox Watermelon Is Ready to Harvest
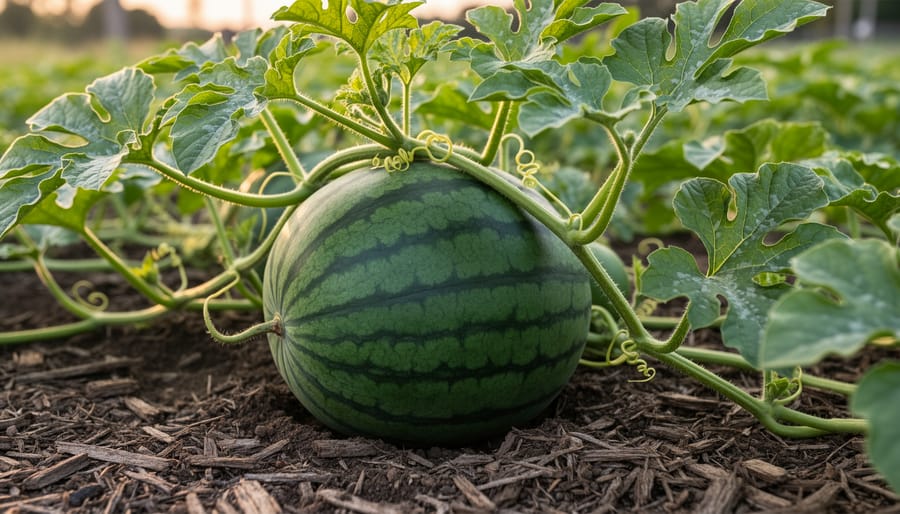
Knowing when to harvest your icebox watermelon makes the difference between a sweet, juicy treat and a disappointing, underripe fruit. Icebox varieties typically mature in 70-85 days from transplanting, but calendar counting alone isn’t reliable. Use multiple ripeness indicators together for the best results.
Check these signs in combination to confirm your watermelon is ready:
- Examine the curly tendril closest to where the stem attaches to the fruit. When it turns brown and completely dries out, harvest time is near.
- Look at the ground spot where the melon rests on soil. It should change from white or pale green to a creamy yellow color.
- Tap the watermelon with your knuckles. A ripe melon produces a deep, hollow sound rather than a high-pitched ping.
- Check the skin texture. The rind should feel firm and resist being scratched with your fingernail, and the surface will have a slightly dull appearance rather than a shiny gloss.
When at least three of these indicators align, your watermelon is ready. To harvest properly, use clean, sharp pruning shears or a knife to cut the stem about two inches from the fruit. Never twist or pull the melon off the vine, as this can damage both the fruit and the plant, potentially affecting any remaining melons still developing.
Handle your harvested watermelon gently to avoid bruising. Wipe off any dirt and move it to a shaded spot immediately. Icebox watermelons can sit at room temperature for up to a week, or refrigerate them for two to three weeks. The compact size means they actually fit in your fridge, living up to their name. For the sweetest flavor, let the melon rest at room temperature for a day before cutting into it.
Troubleshooting Common Growing Problems
Even with the best care, you’ll likely face a hiccup or two. Poor germination usually means the soil was too cold, wait until it’s at least 70°F before planting. If seeds rot, you may have overwatered before they sprouted. Blossom end rot (dark, sunken spots on the fruit’s bottom) signals calcium deficiency or inconsistent watering; mulch around plants and keep moisture steady to prevent it.
Small fruit often results from inadequate pollination or competition, each vine should support only two to four melons for full-sized fruit, so pinch off extras. If you see flowers but no fruit setyou may lack pollinators; hand-pollinate by transferring pollen from male to female flowers with a small brush in the morning. Wilting vines can indicate squash vine borers, look for sawdust-like frass at the base and slit the stem to remove larvae, then mound soil over the wound.
When to salvage versus start over: If borers have hollowed most of the main stem or disease has blackened more than half the leaves, pull the plant and compost it (unless it’s diseased, then discard). For minor issues like a few affected leaves or one borer entry point, treat and monitor; icebox varieties bounce back quickly. If you’re harvesting healthy fruit but want to save seeds for next year choose only fully ripe, disease-free melons to ensure strong genetics.
Choosing the Right Icebox Watermelon Variety for Your Garden
Picking the right icebox variety can make or break your growing season, so here’s what sets the most popular options apart.
Sugar Baby remains the classic choice for good reason. This variety matures in 75-80 days and produces round, 8-10 pound melons with deep red flesh. It’s incredibly reliable, handles heat well, and the dark green rind helps you spot the ground spot easily at harvest time.
Sweet Beauty offers a slightly larger fruit (10-12 pounds) in about 77 days. What makes it stand out is the exceptionally sweet flesh and excellent disease resistance, a smart pick if powdery mildew has plagued your garden before.
Bush Sugar Baby grows on compact, space-saving vines perfect for tight gardens or if you want to grow watermelons in buckets. The fruit runs smaller (6-8 pounds) and takes 80 days, but you’ll fit three plants in the space one standard vine would occupy.
Golden Midget is the oddball that turns golden-yellow when ripe, no guessing games at harvest. It matures fastest at 65-70 days and produces 3-4 pound melons with pink flesh. Choose this if you’ve got a short growing season or want a conversation starter.
Match your variety to your space, timeline, and how you like to harvest.
Frequently Asked Questions About Growing Icebox Watermelon
Can I grow icebox watermelon in containers?
Yes, but choose a very large container, at least 5 gallons, ideally 10 gallons or more, with excellent drainage. Bush varieties like Bush Sugar Baby work best in containers since their compact vines won’t sprawl as much, though you’ll still need to support the heavy fruit and water more frequently than in-ground plants.
How many melons will one plant produce?
A healthy icebox watermelon plant typically produces 2-4 fruits per vine, though this varies by variety and growing conditions. If you want larger individual melons, you can thin to 2-3 fruits per plant once they reach softball size, which directs more energy into fewer fruits.
Can I save seeds from my icebox watermelon for next year?
You can save seeds from open-pollinated varieties like Sugar Baby, and they’ll grow true to type. However, if your variety is a hybrid, the saved seeds won’t reliably produce the same quality fruit, they may revert to characteristics of parent plants or produce inconsistent results.
What’s the main difference between icebox and regular watermelon?
Icebox watermelons are bred to be smaller, typically 6-10 pounds versus 15-30+ pounds for standard varieties, so they fit in a refrigerator and suit smaller gardens with limited space. They also mature faster (70-80 days versus 85-100 days) and have shorter, more manageable vines.
Do icebox watermelons need pollinators to produce fruit?
Yes, watermelons require pollination to set fruit. Bees and other insects transfer pollen from male flowers to female flowers (the ones with a small swelling at the base), so avoid pesticides that harm pollinators and consider hand-pollinating with a small brush if you notice poor fruit set despite plenty of blooms.
These questions come up regularly because new watermelon growers often worry about space constraints, yield expectations, and whether they’re doing enough to help their plants succeed. The container question especially reflects the reality that many gardeners today work with patios or small yards rather than sprawling vegetable plots. Understanding pollination needs can be the difference between a vine full of flowers that drop off and one that actually produces melons, so don’t skip attracting bees to your garden. If you’re still uncertain about a specific growing challenge, review the troubleshooting section or consult your local extension office for region-specific advice.
Growing your own icebox watermelon is one of the most satisfying projects you can tackle in a home garden. These space-saving varieties prove you don’t need acres of land to enjoy homegrown watermelon, just a sunny spot, consistent care, and a little patience. Whether you’ve got a small backyard, raised beds, or even large containers, icebox watermelons fit your space and your fridge.
The beauty of these compact plants is how forgiving they are once you nail the basics. Pay attention to timing so frost doesn’t threaten young seedlings. Water deeply and regularly, especially during flowering and fruit development. Watch for those ripeness signs rather than guessing, and you’ll harvest at peak sweetness every time.
There’s something special about slicing into a watermelon you grew yourself, hearing that crisp crack, and tasting sun-warmed sweetness that store-bought fruit just can’t match. Your effort transforms a tiny seed into pounds of juicy refreshment, and that first bite makes every watering session, every pest check, every hot afternoon in the garden completely worth it. Happy growing!